Build a workflow
The building blocks of automation in Spark, and how to build a workflow from trigger to action end to end.
A workflow is how you make a repeatable operation run on its own. Every workflow is a chain: one trigger that starts it, followed by one or more actions that do the work. This page covers the vocabulary and walks you from an empty list to a working, activated workflow.
Where workflows live
Workflows live in the left navigation under Workflow. The Workflows tab lists every workflow in your workspace along with its status and labels. From here you open an existing workflow or create a new one with New.
Create a workflow
- Open Workflow, then the Workflows tab.
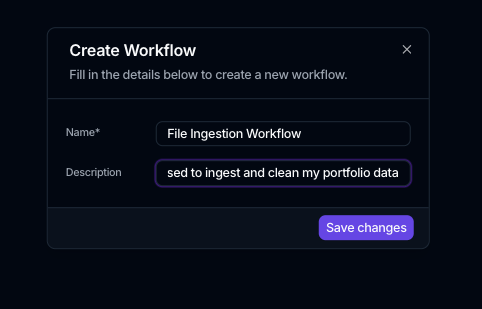
- Click New, then choose Create Workflow.
- Enter a Name and an optional Description.
- Click Save changes.
The workflow opens on the canvas editor and starts as a Draft, so nothing runs until you activate it. The empty canvas prompts you to add a trigger.
Triggers and actions
The two building blocks play different roles:
- A trigger decides when a workflow runs. A workflow has exactly one trigger.
- Actions decide what the workflow does once it starts. You chain several in order, and each can read from or write to your data objects, files, and the rest of the workspace.
You build the chain visually: drop a trigger, then add actions after it. A node picker with a Search actions... box and tabs that group the blocks (All, Trigger, Data, Custom, Analytics, and Collaboration) helps you find the block you want.
Add a trigger
Open the node picker and the Trigger group offers one trigger per kind of event:
| Trigger | Starts the workflow when… |
|---|---|
| Manual | you start it by hand with Run |
| Schedule | a scheduler fires it on a timer (see Scheduling) |
| File received | a file arrives by upload, SFTP, or the workspace email address (see File-triggered workflows) |
| Email received | a message arrives at the workspace email address |
| Record created | a record is added to a data object |
| Record updated | a record in a data object changes |
| Task created | a task is created |
| Task updated | a task changes |
The Manual and Schedule triggers carry no data into the run; the others pass the arriving item (the file, record, or task) to the actions that follow. A workflow started by another workflow doesn't use a trigger node at all; it's made callable through its invocation settings instead (see Invocation).
Add actions
Actions are the steps that run after the trigger, in order.
- Add a node to open the picker again, and search or browse the tabs such as Data and Custom.
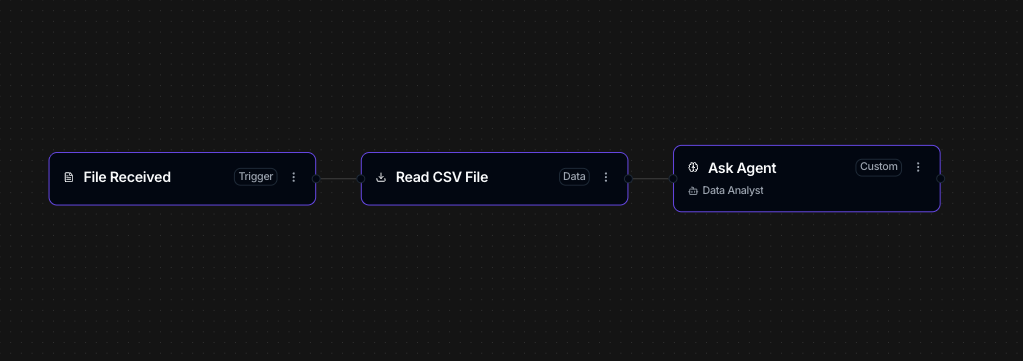
- Pick a block, for example Parse (Read) CSV, and configure its fields in the side panel.
- Add another, such as Filter Records, to narrow the rows the first action produced.
To keep building along the chain, add the next action from the one you just placed rather than returning to empty canvas; the new node arrives already connected. Any warning about mismatched input and output types stays readable while you do it, so a bad connection is visible as you make it.
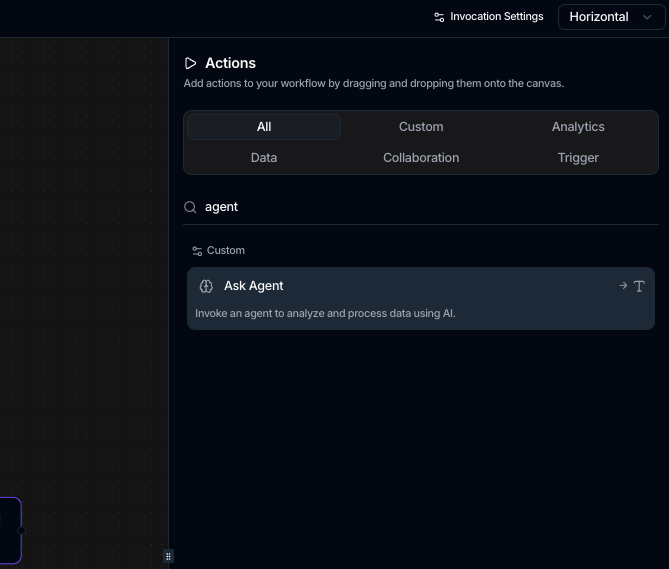
Some of the most common blocks:
| Action | What it does |
|---|---|
| Ask Agent | Hand a step to the Agent for reasoning or judgment |
| Human Review | Pause the run for a person to approve or reject |
| Parse (Read) CSV | Read rows from a CSV file. See Read a CSV or Excel file |
| Parse (Read) XLSX | Read rows from an Excel file. See Read a CSV or Excel file |
| Filter Records | Narrow a set of records by conditions |
| Resolve Relations | Link rows to your reference data, with a reviewer for the keys it cannot find. See Resolve relations |
| Save Record | Write records into a data object, appending or restating a subset. See Save records |
| Compute Analytics | Run a Next Gate Tech analytics component over your data |
| Apply File Label | Label the file that started the run, so it can be grouped and filtered afterwards |
| Reconcile | Match two sets of records against each other and report what agrees, what differs and what is missing |
| Invoke Workflow | Run another workflow as a step |
The Ask Agent action is where deterministic automation meets judgment: use plain actions for steps that must run the same way every time, and hand the parts that need reasoning to the Agent.
Configure an action
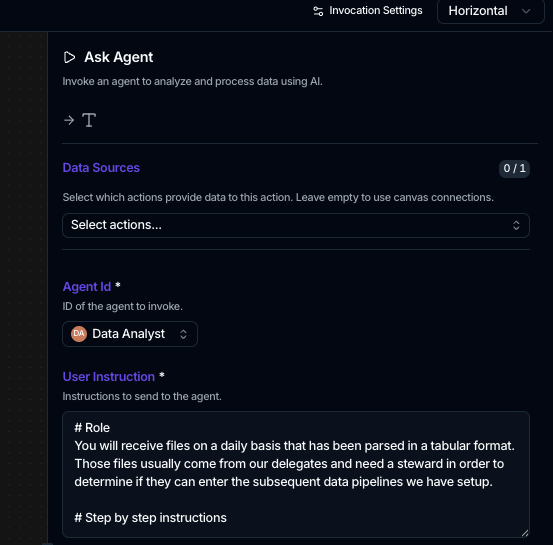
Select an action on the canvas to set its options in the side panel. A few you'll reach for often:
- Ask Agent runs an agent as a step. Pick the Agent, write a User instruction (the prompt), and optionally turn on Use previous action data to feed it the prior step's output. Its Output tab shows the agent's activity and token usage.
- Parse (Read) CSV reads a CSV. Set the delimiter, or leave it empty to detect it per file, and under More options skip a number of header or footer rows. Fixed-width text files instead use a Fixed Width mode with a Column ranges editor, one
start,endrange per line. See Read a CSV or Excel file. - Filter Records keeps only the records that match conditions you add: a field, an operator (equals, contains, greater or less than, is null, and so on), and a value.
A reconciliation can also copy chosen source columns onto every output row. Turn that on for the columns you will want to filter or group the result by, such as a date or an account: a row that matched nothing has no other side to read them from, and those are exactly the rows a reviewer is looking for.
For how each action reads its input data and the types Spark checks between steps, see Action Inputs.
Save, activate and run
As you edit, an Unsaved changes banner appears. Click Save Workflow to keep your chain. Saving does not make the workflow live: its Status stays Draft so you can lay out and check the whole thing safely.
- In the Workflows list, use the workflow's row menu to choose Activate. Its status becomes Active; a workflow must be active before it can run, and Deactivate returns it to Inactive.
- Start a run with Run from the same menu, and confirm in the Run workflow? dialog. For a scheduled workflow, set the timing in Scheduling instead.
- Open the Executions tab to watch the run and confirm each step succeeded.
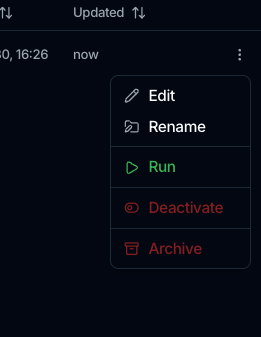
The row ⋮ menu also lets you Rename and Archive a workflow. Archiving is separate from status: it hides a workflow and stops it running, while keeping its run history; Restore brings it back, and the Show archived toggle next to New reveals archived workflows.
Organize workflows with labels
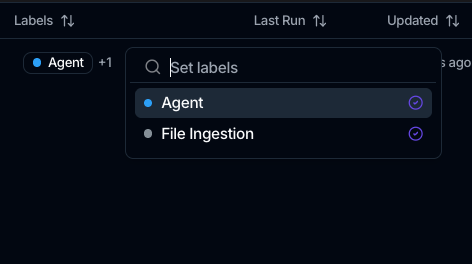
The Workflows list has a Labels column for tagging workflows. Open a workflow's labels cell and use the Set labels picker to apply existing labels or type a new name to create one (each label carries a color). Labels are shared across the workspace. To narrow a long list, open Filter, which lets you filter by Name, Status, or Labels.
Think of a workflow as a sentence: the trigger is the subject that starts it, and the actions are the verbs that follow. Keep triggers narrow and actions focused, and the runs stay easy to read.
Where to go next
- Watch and troubleshoot runs: Executions.
- Wire data between steps: Action Inputs.
- Parameterize a workflow: Context variables.
- Run one workflow from another: Invocation.
- Add a person's sign-off: Human-in-the-loop.
- Read a file, then write records: Read a CSV or Excel file and Save records.